https://josephstankowicz.wordpress.com/2013/06/29/writing-shaders-2-vertex-lighting/
Writing Shaders 2 : Vertex Lighting
Last week’s post on shaders covered building a simple, unlit shader with a texture. While unlit shaders render extremely quickly, they are boring, and generally artists are going to want some form of lighting available in their shader selection. Unity provides some useful pages on shader lighting models, such as this one http://docs.unity3d.com/Documentation/Components/SL-SurfaceShaderLightingExamples.html. This week, I am going to cover the most basic lighting model, diffuse lighting, applied through the vertex program.
To begin, we need to cover a few basics of lighting terminology. For the lights themselves, the ambient light is a scene wide lighting value, applied to everything influenced by lights. Ambient lights can be useful for ensuring that nothing in the scene ends up pure black, and is visible in some fashion. Directional lights are similar to ambient lights in that they are global, but have a directional facing, and cast light based on that direction. Point lights, area lights, spot lights, and other lighting types cast light within specific areas. Here is Unity’s documentation page on lights http://docs.unity3d.com/Documentation/Components/class-Light.html.
The other side of lighting terminology is the light reflection models used by the shaders. Diffuse is the most simple, scattering the light it reflects and appearing very flat. Real world diffuse reflection can be seen on things like paper or fabric. This behavior is caused by the light scattering in many directions when it reflects off the object. The specular lighting model mimics lighting reflecting in a much more uniform direction. Shiny, reflective objects like metals and smooth plastic are often represented with a specular lighting model. The first lit shaders you write are going to be a combination of one or two simple lighting techniques. As you learn more individual shader techniques, you will eventually be able to piece together a very complex shader that combines diffuse and specular lighting with a few other techniques to emulate real world objects, techniques such as environment maps, normal maps, and subsurface scattering. For now, we are going to keep things simple, and just focus on diffuse lighting.
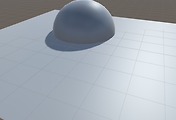
First we are going to cover vertex lighting. Generally, for any given lit object, you will have less vertices than pixels rendered. This results in a fairly fast lighting technique, as the lighting math is done per vertex, and interpolated per pixel rendered. The visual effect is not perfect, as you can see when you compare this vertex lit sphere to this pixel lit sphere, but it can often be good enough, especially on mobile devices.
Vertex lit:  Pixel lit:
 ![]()
This vertex lit shader can only be lit by a single directional light and the ambient light.
Shader “Custom/Vertex_Lit_Texture”
{
Properties
{
_MainTex (“Texture”, 2D) = “white” { }
}
SubShader
{
Pass
{
Tags { “LightMode” = “ForwardBase” }
CGPROGRAM
#pragma vertex vert
#pragma fragment frag
#include “UnityCG.cginc”
#include “Lighting.cginc”
sampler2D _MainTex;
float4 _MainTex_ST;
struct appdata
{
float4 vertex : POSITION;
float3 normal : NORMAL;
float2 texcoord : TEXCOORD0;
};
struct v2f
{
float4 pos : SV_POSITION;
float4 col : COLOR0;
float2 uv : TEXCOORD0;
};
v2f vert (appdata v)
{
v2f o;
o.pos = mul (UNITY_MATRIX_MVP, v.vertex);
o.uv = TRANSFORM_TEX (v.texcoord, _MainTex);
// UnityCG.cginc includes UnityShaderVariables.cginc
// This file defines _WorldSpaceLightPos0 and _World2Object
// UNITY_LIGHTMODEL_AMBIENT is a built in variable, defined here
// http://docs.unity3d.com/Documentation/Components/SL-BuiltinStateInPrograms.html
// _LightColor0 is defined in Lighting.cginc
float4x4 modelMatrixInverse = _World2Object;
float3 normalDirection = normalize(float3(mul(float4(v.normal, 0.0), modelMatrixInverse)));
float3 lightDirection = normalize(float3(_WorldSpaceLightPos0));
float3 diffuseReflection = float3(_LightColor0) * max(0.0, dot(normalDirection, lightDirection));
o.col = float4(diffuseReflection, 1.0) + UNITY_LIGHTMODEL_AMBIENT;
return o;
}
fixed4 frag (v2f i) : COLOR
{
return tex2D (_MainTex, i.uv) * i.col;
}
ENDCG
}
}
}
The first change made is the shader tag marking the light mode as forward base. This tells Unity that this shader only needs a single rendering pass, the base pass, which will only supply it a single light. You can read more information on pass tags here http://docs.unity3d.com/Documentation/Components/SL-PassTags.html and on forward rendering here http://docs.unity3d.com/Documentation/Components/RenderTech-ForwardRendering.html.
The second change is the inclusion of Lighting.cginc. This file contains some helpful variables we can use for building our lighting model. The next change is the inclusion of the vertex normal in the input for the vertex program. The normal is used to determine the facing of the vertex, which we compare against the lighting direction to determine how much that light influences the vertex. There is now a color value passed from the vertex program to the fragment program, which is multiplied against the texture to give a final pixel color.
The first step in the lighting math is to transform the vertex normal into the local object space. I recommend changing that line of code to “float3 normalDirection = v.normal;” to see what happens if you leave your vertex in world space. If you apply lighting without applying the local object’s space, then the rotation, position, and scale of the object will not affect the lighting on the object, it will behave as if it was unrotated at the origin.
If you need a quick refresher on how the dot product works, the dot product of vectors A and B gives you the magnitude of vector A times the magnitude of vector B times the cosine of the angle between the two vectors. By normalizing both input vectors, the dot product gives us the cosine of the angle between both vectors. If the normal of the vertex is facing the exact direction the lighting is facing, then we get a value of one, which means that vertex is fully influenced by that light, and we can apply the color of that light fully. As the angle between the light and the vertex normal approaches 90 degrees, the influence of the light will approach zero. We are clamping the lighting influence to 0, because the light does not subtract color from normals facing away from the light. This lighting influence value is then multiplied against the color of the light, which is then added to the color of the ambient light to give a final color for the vertex.
This is a good stopping point, I know when I first learned shaders I found a lot of this overwhelming. It was easier for me to pick this knowledge up in smaller, focused bite size pieces.
'유니티 엔진' 카테고리의 다른 글
| Making the Post Effect : Blur - 3 (Post Effect 만들기 기본 : 블러 만들기 3 ) (0) | 2015.12.28 |
|---|---|
| Making the Post Effect : Blur - 2 (Post Effect 만들기 기본 : 블러 만들기 2 ) (0) | 2015.12.24 |
| ETC2 File Format (0) | 2015.07.23 |
| 유니티5의 Occlusion은 어떻게 따로 연산되는가? (0) | 2015.06.29 |
| Custom Standard Shader에서 Occlusion Texture 사용할때 안 나타나는 문제 (0) | 2015.06.29 |


댓글