About The Author
 René Schulte is a .Net / Silverlight developer and Microsoft Silverlight MVP passionate about real-time computer graphics, physics, AI, and algorithms. He loves C#, Shaders, Augmented Reality, and computer vision. He started the SLARToolkit, the WriteableBitmapEx, and the Matrix3DEx Silverlight open source projects, and he has a Silverlight website powered by real time soft body physics. He is also a regular author for Microsoft's Coding4Fun. Contact information can be found on his Silverlight website, his blog, or via Twitter.
This article explains how to write pixel shaders for the Microsoft Silverlight and WPF platform with HLSL, as well as how to write an extensible Silverlight application for shader demos.
Introduction
Almost 10 years ago, Microsoft announced DirectX 8.0, including the huge real-time computer graphics milestone, Direct3D 8.0. Direct3D 8.0 introduced programmable shaders and gave the developers a chance to create never-before-seen effects and experiences apart from the fixed-function graphics pipeline. With Direct3D 8.0's new shader capabilities, it became possible to compute neat custom-rendering effects on mainstream graphics hardware. Today's graphics hardware is capable of running hundreds of shaders in parallel and modern games make heavy use of this technology t to achieve stunning effects.
A shader is a rather small program, a so-called kernel function, typically executed in parallel for each data element. Pixel shaders, for example, are executed for each pixel of a bitmap, and therefore used to implement per-pixel effects.
This introductory article will explain how to write pixel shaders for Silverlight and WPF, what tools should be used, and how to work with the tools. Furthermore, it will show how to build an extensible Silverlight shader application.
Demo Application
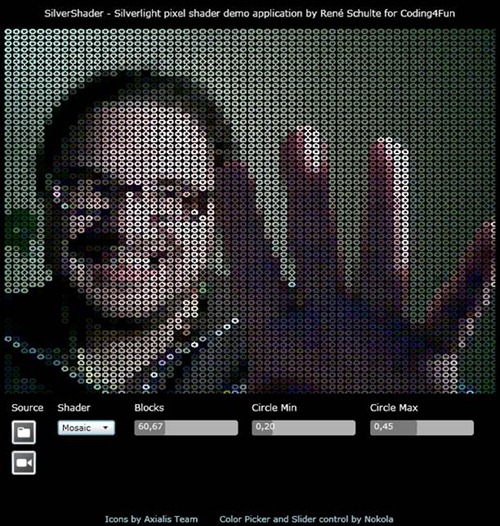
The demo application makes it possible to apply different shaders to an image or to the live stream from the webcam. The application not only comes with the two shaders that will be implemented in this article, it also contains three other shaders I've written before. The complete source code is licensed under the Ms-PL and can be downloaded from the CodePlex site.
You need at least the Silverlight 4 runtime installed to run the sample and a webcam is needed in order to exploit the full functionality. The runtime is available for Windows and Mac.
Figure 1: Screenshot of the demo application
How To Use?
You can start and stop the webcam with the ![]() Button, or you can load an image from disk with the
Button, or you can load an image from disk with the ![]() Button. Use the ComboBox to change the pixel shader that is applied to the source. Each shader has its own controls to change the used parameters. The controls should be pretty much self-explaining. Just try them out.
Button. Use the ComboBox to change the pixel shader that is applied to the source. Each shader has its own controls to change the used parameters. The controls should be pretty much self-explaining. Just try them out.
When you click the ![]() Button for the first time, you'll need to give permission for the capturing. This application uses the default Silverlight capture device. You can specify default video and audio devices with the Silverlight Configuration. Just press the right mouse button over the application, click "Silverlight" in the context menu, and select the "Webcam / Mic" tab to set them.
Button for the first time, you'll need to give permission for the capturing. This application uses the default Silverlight capture device. You can specify default video and audio devices with the Silverlight Configuration. Just press the right mouse button over the application, click "Silverlight" in the context menu, and select the "Webcam / Mic" tab to set them.
Where do start?
What do we have in Silverlight and WPF?
Pixel shaders were introduced with WPF 3.5 SP1, and later with Silverlight 3, as so-called ShaderEffects. ShaderEffects can be applied to any control to create both nice visual effects and new user experiences. WPF 3.5 SP1 and Silverlight support the Shader Model 2, which is limited to a total of 96 instructions (64 arithmetic and 32 texture instructions). Modern DirectX 11 graphics cards already support Shader Model 5, which doesn't have such limits. Silverlight pixel shaders, however, are executed on the CPU and not on the specialized GPU. Since the software rendering pipelines make use of modern CPU capabilities like SSE and multi-core execution, they still run pretty fast and are the right way to implement effects in Silverlight.
WPF renders the shaders slightly different. If the shader is applied to an element which is rendered on the graphics card, the shader will also be executed on the GPU. But if the element is being rendered for printing, certain TileBrushs are used or any other reason prevents hardware acceleration, the element and the shader will be rendered in software. This rendering is done on WPF's render thread and the software shader unit also uses fast SSE instructions like Silverlight's renderer, but does not take advantage of multiple CPU cores.
WPF 4 supports Shader Model 3 with a much higher instruction count limit and these pixel shaders are only executed on the GPU. Due to the more complex computation there's no software rendering fallback. The shader will simply be ignored if it's applied to an element being rendered in software or the graphics hardware doesn't support Shader Model 3.
This article targets Silverlight and WPF and therefore stays within the bounds of the Shader Model 2.
How to program shaders?
There are several ways to write and compile shader programs. Nowadays, the most common method used in the Direct3D and Windows world is a language called High Level Shading Language (HLSL). The Direct3D shader compiler fxc.exe compiles the HLSL code into byte-code, which is then executed by the runtime.
HLSL is a C-style language with some special data types and intrinsic functions, but without pointers. If you know how to write code in a C-style language like C#, you will quickly learn how to write a shader with HLSL. By the way, if you know HLSL, you also know NVIDIA's shading language Cg. Cg and HLSL have the same root and are very similar.
HLSL defines scalar and various vector / matrix data types for integer and floating point operations. The built-in intrinsic functions support scalar and vector data types. Flow-control statements—such as if, switch, for, and while—are also possible. Of course, the curly brace is used for code blocks and most of the C operators are also supported. The compiler uses semantics to both determine the intended usage of a parameter and provide the right data for it. The register keyword is typically used to pass a parameter into the shader program. The elements of the vector types can be accessed through various aliases, such as x, y, z, w; r, g, b, a; u, v; etc. It's also possible to combine these and write nice and short statements by using swizzling:
HLSL
// Create 3D float vector a and b with different syntax
float3 a = float3(1, 2, 3);
float3 b = {5, 6, 7};

// Calculate cross product of vector a and b using swizzling
float3 crossProduct = a.yzx * b.zxy - a.zxy * b.yzx;
The MSDN is a great resource for HLSL and provides detailed explanations of the syntax and functions. The following examples will make it clearer and the explanations should help to get you started.
What tools to use?
Of course, it's possible to write a pixel shader with a simple text editor and compile it with the command line tool fxc.exe, but there's a great tool available that makes the process a lot easier. The Shazzam Tool by Walt Ritscher is THE utility for Silverlight and WPF shader development. It comes with an HLSL editor, which includes syntax highlighting, that compiles the shader and applies it right away to a sample input. It also generates controls for each parameter, which may be used to change the shader settings on the fly, and it creates the needed C# or VB source code file with a class that is derived from ShaderEffect.
Here's what you need to get started:
- Download the DirectX SDK and install it.
- Download the Shazzam Tool and install it.
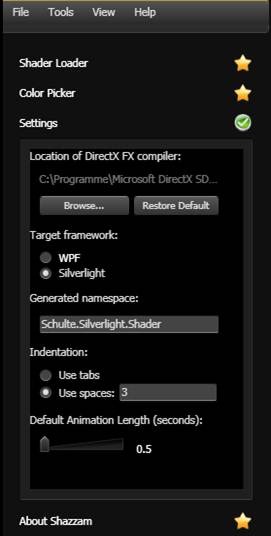
- After the Shazzam Tool is started, verify that the path to the DirectX FX compiler is set (Figure 2). The fxc.exe is normally located in the DirectX SDK installation folder under Utilities\bin\x86. Also make sure the right Target framework is selected and a Generated namespace is set.
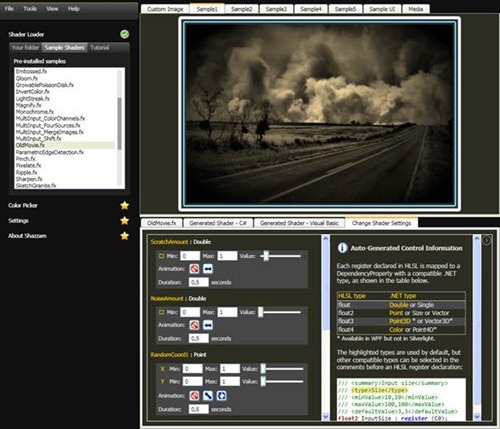
- To see if everything works, open a Sample Shader with the Shader Loader, select a sample tab page, and try the controls on the Change Shader Settings page (Figure 3).
Figure 2: Shazzam Tool Settings
Figure 3: Shazzam Tool Overview
How to write a pixel shader?
Now that we have the right tools installed and configured, we are ready to write the first pixel shader and the Silverlight application that will use it.
Example 1: The Tint Shader
The first pixel shader we're writing is a rather simple tint shader that converts the pixel into gray and tints it with a parameterized color.
In the Shazzam Tool, select File à New Shader File, choose a location for the HLSL FX file, and name it TintShader. Shazzam will automatically create the basic pixel shader code, including a float parameter SampleI. Hit the F5 key to compile and apply the shader to the selected sample image.
HLSL
sampler2D input : register(s0);

/// <summary>Explain the purpose of this variable.</summary>
/// <minValue>05/minValue>
/// <maxValue>10</maxValue>
/// <defaultValue>3.5</defaultValue>
float SampleI : register(C0);

float4 main(float2 uv : TEXCOORD) : COLOR
{
    float4 Color;
    Color = tex2D(input, uv.xy);
    return Color;
}
The input register is the actual bitmap / texture that holds the pixels and is sampled inside the pixel shader. This pixel shader main function is the entry point and is executed for each pixel of the input bitmap. The coordinate of the current pixel that is processed is passed as the float2 parameter uv. This coordinate is normalized to the range [0, 1]. The color of the pixel at the passed uv coordinate is sampled as float4 with the built-in tex2D intrinsic function. A float4 COLOR value is expected as the return value of the pixel shader.
Figure 4: Output of the initial shader code (original image)
The initial pixel shader code returns the original color for each pixel and we use this as the starter for our gray scale conversion.
Gray Conversion
HLSL
sampler2D input : register(s0);

float4 main(float2 uv : TEXCOORD) : COLOR
{
   // Sample the original color at the coordinate
   float4 color = tex2D(input, uv);

   // Convert the color to gray
  float gray = dot(color.rgb, float3(0.2126, 0.7152, 0.0722));

   // Return gray with the original alpha value
   return float4(gray, gray, gray, color.a);
}
The original color is sampled and then converted to gray using the dot product of the red, green, and blue values with a constant float3 vector. The result actually represents the luminance of the pixel. The dot product multiplies the elements of the color vector with the elements of constant vector and adds the three products, thus resulting in a scalar float value. The return value of the pixel shader is a new color made up of the gray value for RGB and the original alpha (transparency) of the sampled pixel.
Figure 5: Output of the gray conversion shader
Parametric Tinting
The gray conversion shader can now be extended to tint the output in a color that is passed as a parameter through a shader register.
HLSL
/// <summary>The tint color.</summary>
/// <type>Color</type>
/// <defaultValue>0.9,0.7,0.3,1</defaultValue>
float4 TintColor : register(C0);

sampler2D Input : register(s0);

float4 main(float2 uv : TEXCOORD) : COLOR
{
   // Sample the original color at the coordinate
   float4 color = tex2D(Input, uv);

   // Convert the color to gray
   float gray = dot(color.rgb, float3(0.2126, 0.7152, 0.0722));

   // Create the gray color with the original alpha value
   float4 grayColor = float4(gray, gray, gray, color.a);

   // Return the tinted pixel
   return grayColor * TintColor;
}
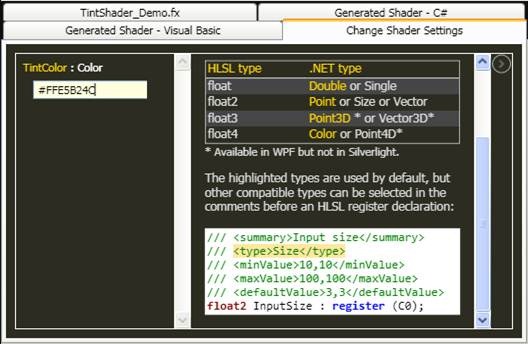
The color used to tint every pixel is passed as a parameter and therefore defined as the first register C0 (the next parameter should then be in the register C1). The XML comment is used by Shazzam to both create convenient controls and initialize the generated code. Shazzam creates the appropriate controls for the data type and uses the defaultValue, minValue and maxValue (Figure 6). The changed value of the control is applied directly to the Sample image, which allows a quick and easy shader development.
Each element (RGBA) of the passed TintColor parameter is then multiplied with the float4 gray color and returned. The result of the default TintColor values is a sepia-toned image (Figure 7).
Figure 6: Shazzam Tool Shader Settings
Figure 7: Output of the tint shader
Wiring it together with Silverlight
Now it's time to use the shader in a Silverlight application and apply it to an Image, MediaElement, or whatever UIElement you like.
- Start Visual Studio, create a new Silverlight Application project, and select at least Silverlight 3 as the target framework.
- In the Shazzam Tool, click on Compile Shader in the Tools menu and then on Explore Compiled Shaders. Make sure the Generated namespace setting (Figure 2) matches the assembly name of the Silverlight application.
- Copy the compiled shader file TintShader.ps and the corresponding C# or VB TintShaderEffect.cs|vb file from the GeneratedShaders folder and the CS|VB subfolder into the Silverlight project directory.
- In Visual Studio, add the TintShaderEffect.cs|vb and the TintShader.ps file to the project. The property Build Action of the TintShader.ps file must be set to Resource. Rebuild the solution.
- Open the MainPage.xaml file and add the namespace declaration and a Button or any other control that has the TintShaderEffect class applied (see below).
- Hit the F5 key and see your Silverlight shader application in action (Figure 8).
XAML
<UserControl x:Class="ShaderDemoApp.MainPage"
    xmlns="http://schemas.microsoft.com/winfx/2006/xaml/presentation"
    xmlns:x="http://schemas.microsoft.com/winfx/2006/xaml"
    xmlns:d="http://schemas.microsoft.com/expression/blend/2008"
    xmlns:mc="http://schemas.openxmlformats.org/markup-compatibility/2006"
    mc:Ignorable="d"
    d:DesignHeight="300" d:DesignWidth="400"
    xmlns:local="clr-namespace:ShaderDemoApp">

    <Grid x:Name="LayoutRoot" Background="Gray">
        <Button Content="Big Tinted Button" Width="200"
                Height="200" Background="Blue">
            <Button.Effect>
                <local:TintShaderEffect />
            </Button.Effect>
        </Button>
    </Grid>
</UserControl>
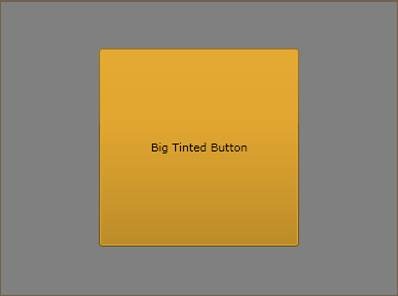
Figure 8: The TintShader applied to the Button
That's all that's needed to get a pixel shader working inside a Silverlight application. Please note that no manual C# or VB code-behind was written.
Example 2: The Mosaic Shader aka The Donut Shader
The second post process shader effect we'll write is a bit more advanced. It starts with pixelating the image before rounding the blocks until we've the final Mosaic-like result.
For the development of this shader, we can use a different image. To do so, click the Open Image File menu item in Shazzam's File menu. I used a famous test picture for image processing algorithms: Lenna. By the way, there's an interesting story behind this picture of Lena Söderberg.
Figure 9: Original Lenna test image
Pixelating the Input
HLSL
/// <summary>The number of pixel blocks.</summary>
/// <type>Single</type>
/// <defaultValue>25</defaultValue>
float BlockCount : register(C0);

sampler2D input : register(S0);

// Static computed vars for optimization
static float BlockSize = 1.0f / BlockCount;

float4 main(float2 uv : TEXCOORD) : COLOR
{
   // Calculate block center
   float2 blockPos = floor(uv * BlockCount);
   float2 blockCenter = blockPos * BlockSize + BlockSize * 0.5;

   // Sample color at the calculated coordinate
   return tex2D(input, blockCenter);
}
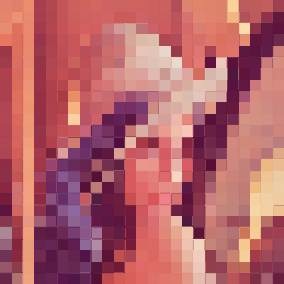
The float BlockCount parameter defines into the number of blocks (large pixels) into which the resulting image will be divided (pixelated). The size of a block (BlockSize) is the inverse of the BlockCount and calculated as static float to save some clock cycles. The coordinate of the current pixel (uv) is then used to determine the block to which it belongs. This determination depends on the BlockCount and is a result of the built-in floor function. To get the color of the output pixel, the center coordinate of each block is sampled for all the pixels that are part of the block.
Figure 10: Output of the pixelation step
Rounding the Pixels
HLSL
/// <summary>The number of pixel blocks.</summary>
/// <type>Single</type>
/// <defaultValue>25</defaultValue>
float BlockCount : register(C0);

/// <summary>The rounding of a pixel block.</summary>
/// <type>Single</type>
/// <defaultValue>0.45</defaultValue>
float Max : register(C2);

sampler2D input : register(S0);

// Static computed vars for optimization
static float BlockSize = 1.0f / BlockCount;

float4 main(float2 uv : TEXCOORD) : COLOR
{
   // Calculate block center
   float2 blockPos = floor(uv * BlockCount);
   float2 blockCenter = blockPos * BlockSize + BlockSize * 0.5;

   // Round the block by testing the distance
   // of the pixel coordinate to the center
   float dist = length(uv - blockCenter) * BlockCount;
   if(dist > Max)
   {
      return 0;
   }

   // Sample color at the calculated coordinate
   return tex2D(input, blockCenter);
}
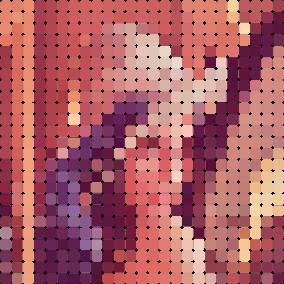
The Max parameter defines the maximum distance of a pixel to its block center and, therefore, the rounding of a pixel block. If the length of the vector between the current pixel coordinate (uv) and its block center is greater than the Max parameter, a transparent pixel (0) is returned. The built-in length function is used to calculate the scalar length of the distance vector.
Figure 11: Output of the rounding step (Max = 0.45)
Figure 12: Output of the rounding step (Max = 0.60)
Baking Donuts
HLSL
/// <summary>The number of pixel blocks.</summary>
/// <type>Single</type>
/// <defaultValue>25</defaultValue>
float BlockCount : register(C0);

/// <summary>The rounding of a pixel block.</summary>
/// <type>Single</type>
/// <defaultValue>0.2</defaultValue>
float Min : register(C1);

/// <summary>The rounding of a pixel block.</summary>
/// <type>Single</type>
/// <defaultValue>0.45</defaultValue>
float Max : register(C2);

sampler2D input : register(S0);

// Static computed vars for optimization
static float BlockSize = 1.0f / BlockCount;

float4 main(float2 uv : TEXCOORD) : COLOR
{
   // Calculate block center
   float2 blockPos = floor(uv * BlockCount);
   float2 blockCenter = blockPos * BlockSize + BlockSize * 0.5;

   // Round the block by testing the distance
   // of the pixel coordinate to the center
   float dist = length(uv - blockCenter) * BlockCount;
   if(dist < Min || dist > Max)
   {
      return 0;
   }

   // Sample color at the calculated coordinate
   return tex2D(input, blockCenter);
}
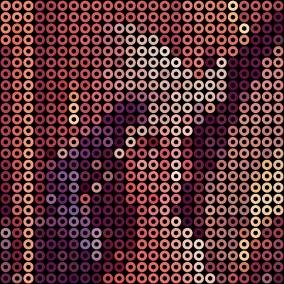
The last thing left to do in order to get some nice rings (donuts) is to add a test for the minimum distance. This is pretty easy and done with the additional Min parameter.
Figure 13: Output of the ring step (Min = 0.20, Max = 0.45)
Please note that all of the parameters can be animated, which could result in a nice (transition) effect when two images are overlaid. The Shazzam Tool also supports animation with the generated Shader Settings controls.
How does the Demo Application work?
The Silverlight demo application is quite flexible and can be used for many different shader effects without touching the core functionality. This last part of the article will show how this extensibility was achieved. Explanations of how to use the webcam with Silverlight and how to load an image from disk were detailed in my last Silverlight Face Detection article.
The application's extensibility was mainly accomplished by using the Managed Extensibility Framework (MEF) and a View-ViewModel approach for the shader parameters. MEF is a great way to make decoupled and flexible applications and has been part of the Silverlight framework since version 4. MEF is like Meth for .Net and Silverlight developers, but without all the undesirable side effects.
The beauty of MEF is best illustrated using source code. As you can see in the demo application (Figure 1), it's possible to select a pixel shader with a ComboBox. The items in the MainPage's shader ComboBox are populated through data binding an ObservableCollection <T> and MEF is used to build this collection.
C#
/// <summary>
/// The main Page of the application.
/// </summary>
public partial class MainPage : UserControl
{
   [ImportMany(AllowRecomposition = true)]
   public ObservableCollection<IShaderViewModel> Shaders;

   public MainPage()
   {
      InitializeComponent();
   }

   private void Initialize()
   {
      // Compose the parts with MEF
      var container = new CompositionContainer(
            new AssemblyCatalog(GetType().Assembly));
      container.ComposeParts(this);

      // Fill ComboBox
      CmbShaders.ItemsSource = Shaders;
      CmbShaders.DisplayMemberPath = "Name";
      CmbShaders.SelectedIndex = 0;

      // ...
   }

   // ...
}

/// <summary>
/// Interface of a ViewModel for a shader effect.
/// </summary>
[InheritedExport]
public interface IShaderViewModel
{
   string Name { get; }
   ShaderEffect Shader { get; }
   UserControl View { get; }
}
The MainPage has a Shaders collection property containing items that implement the IShaderViewModel interface. This collection is initialized by using MEF's CompositionContainer with an AssemblyCatalog and the ComposeParts method. ComposeParts analyses all types in the provided Catalog (here, the assembly), checks if they have certain attributes attached, and wires these so-called parts together. To put it simply, an instance of a type decorated with an Export attribute is created and assigned to each field / property / parameter of the type that has an Import attribute attached.
The IShaderViewModel interface has the InheritedExport attribute attached, which means that implementations of this interface will automatically provide that export. The Shaders collection in turn uses the ImportMany attribute, telling MEF to populate the list with all matching exports (here, all classes that implement the IShaderViewModel interface).
After MEF fills the collection, it is data bound to the ItemsSource property of the ComboBox. The Name property of the IShaderViewModel interface is used as DisplayMember.
The advantage of MEF should be pretty obvious here: you have to implement an IShaderViewModel and maybe a View UserControl for the shader's parameters, but you don't need to add an instance of the shader ViewModel to the Shaders collection manually. Since the IShaderViewModel has the InheritedExport attribute attached, it's not even necessary to add a special MEF attribute to the new shader ViewModel type. Additionally, it's possible to load an extra assembly asynchronously and let MEF compose the parts and update the collection afterwards. By setting the AllowRecomposition parameter of the ImportMany attribute to true we're asking MEF to allow dynamic updates.
As you can see, MEF is pretty easy but also very powerful. But we have just scratched the surface—this blog post and the MSDN are good starters if you want to learn more about MEF.
Further Resources
There are many great HLSL shader development resources available on the web. The following list contains some sites focused on Silverlight / WPF pixel shaders. If I forgot a great resource, please post it in a comment.
- The open source WPF Pixel Shader Effects Library at CodePlex contains a lot of common pixel shader effects.
- Nikola Mihaylov (aka Nokola) wrote a great online image editor in Silverlight that uses pixel shaders for the effects. He released the pixel shaders that are used in EasyPainter as open source. And he also released the custom controls from his tool. The Slider and the ColorPicker used in the demo application are from there. I just changed some properties to Dependency Properties to make the controls bindable. So Kudos to Nikola!
- Walt Ritscher's amazing Shazzam Tool also comes with many cool pixel shaders as samples. Kudos to Walt for making such a great tool!
- Additionally, from time to time I write some shaders and put them up on my blog. Now that we have an extensible Silverlight shader demo application, I will surely integrate my upcoming shaders directly into it.
While I was writing this article, an open source project called WPF Meta-Effects was released on CodePlex. The WPF Meta-Effects framework makes it possible to write Shaders for WPF in C# by using attributes, delegates, and dynamic HLSL compilation. It's a neat idea, but due to its dynamic compilation of shaders it's limited to WPF and can't be used with Silverlight. Additionally, I much prefer the simplicity of HLSL to C# when writing shaders. There's a reason why HLSL was invented: see the examples yourself.
Conclusion
This article explained what shaders and HLSL are, as well as how to write pixel shaders for Silverlight and WPF. It also showed what tools / frameworks to use for the best developer experience and gave an introduction on how to write an extensible application with MEF.
I hope it diminished any fear of the HLSL language and the shader development. I also hope it both inspires and helps you to write your own shaders. I'm eager to see what you come up with. Have fun!
The links to the live demo app and source code are at the top of the article.
'Shader ' 카테고리의 다른 글
| 유니티 5.0의 shader (0) | 2015.03.06 |
|---|---|
| 메쉬를 이용한 유니티 실시간 그림자 (5) | 2015.02.24 |
| tex2Dlod는 안드로이드 기기에서 돌아가지 않는다. (0) | 2015.02.11 |
| tex2Dlod와 tex2Dbias의 비교연구 (0) | 2015.02.01 |
| tex2dlod / tex2dbias (0) | 2015.01.25 |







댓글